UMD System Users Guide
User Guide for UMD System
Introduction
UMD System Overview
The Data Analysis System has adopted UMD, a middleware developed mainly by EGI (European Grid Infrastructure) to enable WLCG. UMD is a replacement middleware of gLite3.2, which has been used in former system. In this document, we call this UMD-featured system the "UMD System". Note: WLCG (Worldwide LHC Computing Grid) is a GRID computing infrastructure for LHC.
UMD System provides following functions:
- Sharing computing resources between domestic and overseas research institutes
- Managing, sharing and utilizing massive data
- Monitoring of resource utilization
- Efficient user management
Component overview of UMD System is shown below.
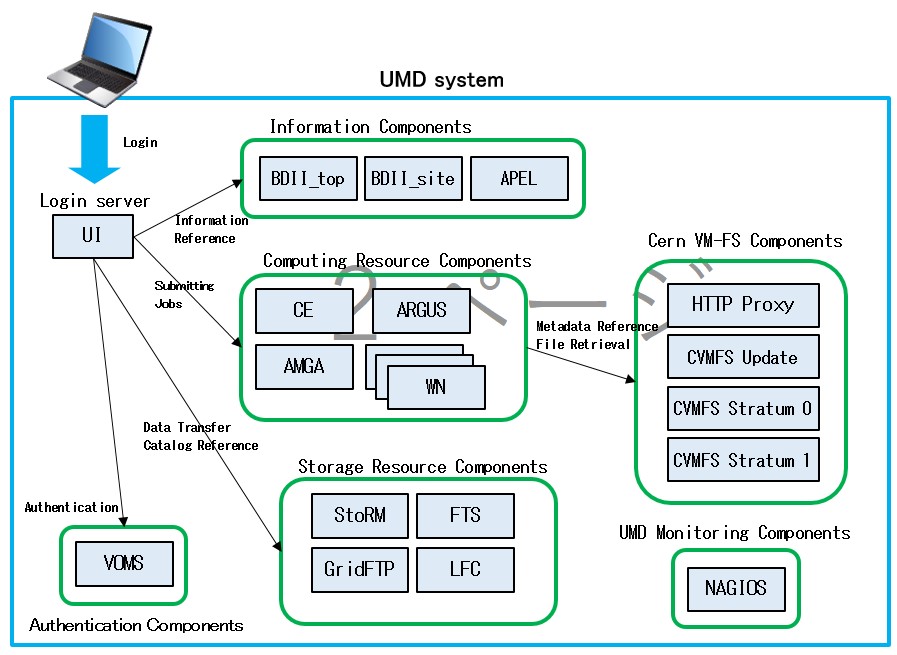
The function of each components is described below.
- UI (User Interface)
UI provides client functions such as user authentication, job submission and data transfer. In this system, the UI features contained within "/cvmfs/grid.cern.ch/" on work servers are available. - CE (Computing Element)
CE provides management of jobs, and job dispach to execution nodes. UMD System has ARC CE as a CE. CREAM coordinates LRMS (Local Resource Management System) to dispatch jobs. UMD System uses LSF scheduler for LRMS. - WN (Worker Node)
WN provides job execution function. In this system, WN is managed by LSF. - StoRM (STOrage Resource Manager)
StoRM provides access to storage resources used in the UMD System. StoRM defines storage area and provides a function to access storage resources. GHI file system and GPFS Servers are used for assignment data. - BDII (Berkeley Database Information Index)
BDII collects resource information of EMI environment which users can refer to. In UMD System, BDII top and BDII site components are provided. BDII site collects information of internal components, and BDII top collects that of external components. - VOMS (Virtual Organization Membership Service)
VOMS manages user information related VO (Virtual Organization). VOMS also proceeds user query for LCG sites which supports VO managed in this system. - CVMFS (CernVM File System)
It provides file system for utilizing data processing software resources in high energy physics developed in research institutes.
Hostnames of components are listed below.
| gLite system component | Hostname |
|---|---|
| UI | login.cc.kek.jp cw.cc.kek.jp |
| CE | kek2-ce01.cc.kek.jp kek2-ce02.cc.kek.jp |
| WN | cb001.cc.kek.jp~cb063.cc.kek.jp |
| StoRM | kek2-se01.cc.kek.jp kek2-se02.cc.kek.jp kek2-se03.cc.kek.jp |
| BDII | kek2-bdii.cc.kek.jp (BDII_top) kek2-sbdii.cc.kek.jp (BDII_site) |
| VOMS | voms.cc.kek.jp |
| CVMFS Stratum 0 | cvmfs-stratum-zero.cc.kek.jp |
| CVMFS Stratum 1 | cvmfs-stratum-one.cc.kek.jp |
Requirement for using UMD System
- This system requires user certificate. For Certification Authority which provides available certificates for UMD System, please refer to the following link.
WLCG -
KEK provides CA system called KEK GRID CA. For details, please refer to the following link.
KEK GRID CA -
This system requires registration to a VO this system supports. Please refer to the following link for VO registration information.
Operation Portal
Info
The above page requires your user certificate.
Available VOs of the UMD System
(UMD System manages by VOMS server)
belle
ppj
(Other supported VOs)
calice
dteam
geant4
ilc
ops
t2k.org
kagra
vo.france-asia.org
For VO information managed by this system VOMS server, you can refer following link. KEK VOMS Server
Info
The above page requires your user certificate.
User Interface(UI)
Login to UI
In this system, UI component is integrated with work servers of Central Computing System. An user account of Central Computing System is needed to use the UI. For registration, please see the following link. https://ccportal.kek.jp/
When you access to a work server, you should use SSH vertion2. The hostname of work server is either "login.cc.kek.jp", "ccw.cc.kek.jp" or "ccx.cc.kek.jp".
#> ssh -l username ccw.cc.kek.jp ↓
username : user account
You are asked to input password. If you enter correct password, you can log in to a work server.
Set up in order to use the UI
In the home directory of the work server to create the environment variable setup file for the UI.
#> cp /cvmfs/grid.cern.ch/etc/profile.d/setup-cvmfs-ui.sh . ↓
#> vi setup-cvmfs-ui.sh ↓
Edit as in the table below.(Examples utilizing UMD Systems in KEK)
| ENVIRONMENT VARIABLE NAME= | VALUE |
|---|---|
| base= | /cvmfs/grid.cern.ch/alma9-ui-test |
| export X509_CERT_DIR= | /etc/grid-security/certificates |
| export X509_VOMS_DIR= | /etc/grid-security/vomsdir |
| export VOMS_USERCONF= | /etc/grid-security/vomses |
| export MYPROXY_SERVER= | Comment out |
| export LCG_GFAL_INFOSYS= | kek2-bdii01.cc.kek.jp:2170,kek2-bdii02.cc.kek.jp:2170,bdii.grid.sinica.edu.tw:2170 |
| export BDII_LIST= | Comment out |
| export LD_LIBRARY_PATH= | ${base}/lib64:${base}/lib:${base}/usr/lib64:${base}/usr/lib:/usr/lib64:/usr/lib |
| export PERL5LIB= | ${base}/usr/lib64/perl5/vendor_perl:${base}/usr/lib/perl5/vendor_perl:${base}/usr/share/perl5 |
| export PYTHONPATH= | ${base}/usr/lib64/python2.7/site-packages:${base}/usr/lib/python2.7/site-packages |
| export JAVA_HOME= | /usr/lib/jvm/jre |
Add the following environment variable. This is all or VO to use.
You can determine the VO name available at <VO name> of "VO_ <VO name> _DEFAULT_SE" of the environment variable name.
| export ENVIRONMENT VARIABLE NAME= | VALUE |
|---|---|
| export VO_VO_FRANCE_ASIA_ORG_DEFAULT_SE= | kek2-storm01-frontend-2.cc.kek.jp |
| export VO_T2K_ORG_DEFAULT_SE= | kek2-storm01-frontend-2.cc.kek.jp |
| export VO_PPJ_DEFAULT_SE= | kek2-storm01-frontend-2.cc.kek.jp |
| export VO_OPS_DEFAULT_SE= | kek2-storm01-frontend-2.cc.kek.jp |
| export VO_KAGRA_DEFAULT_SE= | kek2-storm01-frontend-2.cc.kek.jp |
| export VO_ILC_DEFAULT_SE= | kek2-storm01-frontend-2.cc.kek.jp |
| export VO_GEANT4_DEFAULT_SE= | kek2-storm01-frontend-2.cc.kek.jp |
| export VO_G4MED_DEFAULT_SE= | kek2-storm01-frontend-2.cc.kek.jp |
| export VO_FKPPL_KISTI_RE_KR_DEFAULT_SE= | kek2-storm01-frontend-2.cc.kek.jp |
| export VO_DTEAM_DEFAULT_SE= | kek2-storm01-frontend-2.cc.kek.jp |
| export VO_CDFJ_DEFAULT_SE= | kek2-storm01-frontend-2.cc.kek.jp |
| export VO_CALICE_DEFAULT_SE= | kek2-storm01-frontend-2.cc.kek.jp |
| export VO_BELLE_DEFAULT_SE= | kek2-storm01-frontend-2.cc.kek.jp or kek2-storm03-frontend-2.cc.kek.jp |
And, add the following environment variable.
| export ENVIRONMENT VARIABLE NAME= | VALUE |
|---|---|
| export GLOBUS_TCP_PORT_RANGE= | 20000, 25000 |
Apply the environment variable.
#> . setup-cvmfs-ui.sh ↓
If you add a command to the home directory in the ".bash_profile" or ".bashrc" to apply the environment variable, would apply the environment variables automatically the next login.
Example that you want to add to the ".bash_profile".
 #> vi $HOME/.bash_profile ↓

 Add the following to the last line, and then save the file.
 . setup-cvmfs-ui.sh ↓
User Authentication
Preparation
For preparation, put a certificate file to your home directory. How to get it, see this link ( The command path is /opt/kek/caclt/bin/certreq on KEKCC work servers )
After log in to a work server, make a new directory in your home directory.
#> mkdir $HOME/.globus ↓
#> chmod 700 $HOME/.globus ↓
Put your certificate pair (usercert.pem and userkey.pem) in .globus directory.
Info
usercert.pem and userkey.pem are important files for authentication.
You must not release userkey.pem for other person. You should set the correct permission to certificate files.
#> cd $HOME/.globus ↓
#> chmod 644 usercert.pem ↓
#> chmod 400 userkey.pem ↓
Proxy certificate
To obtain a proxy certificate, run the following command to obtain a proxy certificate.
To use the ARC CE features, you must issue a proxy certificate using the ARC CE command.
To obtain a proxy certificate, execute the following command.
#> voms-proxy-init -voms voname ↓

For ARC CE
#> arcproxy -S voname ↓

voname : VO name

Sample)
 voms-proxy-init -voms ppj ↓

For ARC CE
 arcproxy -S ppj ↓
When you execute this command, a passphrase of certificate is required. After you enter the correct passphrase, proxy certificates is issued. You can now be authenticated with this proxy certificate.
Also, you can set group and role when you enter voms-proxy-init as shown below.
Setting a group
#> voms-prox-init -voms voname:/voname/GROUP ↓

For ARC CE
#> arcproxy -S voname:/voname/GROUP

Sample)
 voms-proxy-init -voms ppj:/ppj/test ↓

For ARC CE
 arcproxy -S ppj:/ppj/test
Setting a role
#> voms-proxy-init -voms voname:/voname/Role=ROLE ↓

For ARC CE
#> arcproxy -S voname:/voname/Role=ROLE ↓

Sample)
 voms-proxy-init -voms ppj:/ppj/Role=production

For ARC CE
 arcproxy -S ppj:/ppj/Role=production
You can set both group and role.
#> voms-proxy-init -voms voname:/voname/GROUP/Role=ROLE ↓

For ARC CE
#> arcproxy -S voname:/voname/GROUP/Role=ROLE ↓

Sample)
 voms-proxy-init -voms ppj:/ppj/test/Role=production

For ARC CE
 arcproxy -S ppj:/ppj/test/Role=production
Confirm the proxy certificate
You can confirm the proxy information by using following command.
#> voms-proxy-info -all ↓

For ARC CE
#> arcproxy -I ↓
Please confirm that the attribute line includes VO name and that the value of timeleft is not 0.
======================================================
$ voms-proxy-info -all
subject   : /C=JP/O=KEK/OU=CRC/CN=TEST USER/CN=proxy
issuer    : /C=JP/O=KEK/OU=CRC/CN=TEST USER
identity  : /C=JP/O=KEK/OU=CRC/CN=TEST USER
type      : full legacy globus proxy
strength  : 1024 bits
path      : /tmp/x509up_u12345
timeleft  : 12:00:00
key usage : Digital Signature, Non Repudiation, Key Encipherment, Data Encipherment
=== VO ilc extension information ===
VO        : ppj
subject   : /C=JP/O=KEK/OU=CRC/CN=TEST USER
issuer    : /C=JP/O=KEK/OU=CRC/CN=host/voms.cc.kek.jp
attribute : /ppj/Role=production/Capability=NULL
timeleft  : 12:00:00
uri       : voms.cc.kek.jp:15023
======================================================

For ARC CE
======================================================
$ arcproxy -I
Subject: /C=JP/O=KEK/OU=CRC/CN=TEST USER/CN=proxy
Issuer: /C=JP/O=KEK/OU=CRC/CN=TEST USER
Identity: /C=JP/O=KEK/OU=CRC/CN=TEST USER
Time left for proxy: HH hours MM minutes SS seconds
Proxy path: /tmp/x509up_u28950
Proxy type: X.509 Proxy Certificate Profile RFC compliant impersonation proxy - RFC inheritAll proxy
Proxy key length: 1024
Proxy signature: sha512
====== AC extension information for VO ppj ======
VO        : ppj
subject   : /C=JP/O=KEK/OU=CRC/CN=TEST USER
issuer    : /C=JP/O=KEK/OU=CRC/CN=host/voms.cc.kek.jp
uri       : voms.cc.kek.jp:15020
attribute : /ppj/Role=production/Capability=NULL
attribute : role = production (ppj)
attribute : /ppj/Role=NULL/Capability=NULL
Time left for AC: HH hours MM minutes SS seconds
======================================================
Discard proxy certificates
You can discard your proxy certificates using following command.
#> voms-proxy-destroy ↓

For ARC CE
#> arcproxy -r ↓
Get resource information
You need the information of resource location for submitting jobs and transferring data. lcg-infosites command provides you the VO resource information.
#> lcg-infosites --vo voname component ↓
voname : VO name
component :target component
Available target of components is listed below.
| all | dli | tag |
|---|---|---|
| bdii_site | dliLocal | vobox |
| bdii_top | fts | voms |
| ce | gridice | voms-admin |
| closeSE | lb | voview |
| cream | lcg-ce | wms |
Example:List the available CEId for ppj VO
#> lcg-infosites --vo ppj ce ↓
Submitting jobs
Available queues
Job scheduler LSF is used in this system. The available queue depends on your VO and role.
The available queues for UMD System are listed in UMD Queue List pages.
How to submit a job
To submit a job, the following steps are needed.
Prepare the job file
Gather the CEId information
Submit a job
Manage a job
Get the output of job
The following section explains job submission methods.
Prepare a job file
A job for UMD is defined by a job description file written in xRSL(job description language). You need to create a xRSL file for job submisson. You should also prepare script file to execute on WN.
Below shows a sample xRSL file and a script file.
Sample xRSL file;
file name: test.xrsl
&
( executable = "/bin/sh" ) # Execution shell
( arguments = "test.sh" ) # Execute the script
( inputFiles = ( "test.sh" "") ) # Input files for the job
( outputFiles = ( "output.txt" "gsiftp://" ) ) # Output files to the job and the destination (*1)
( stdout = "std.out" ) # Standard output file
( stderr = "std.err" ) # Error output file
( queue = "gridbelle_middle" ) #Execution queue (*2)

1: When the destination is omitted, use "( "output.txt" "")".
2: Refer to "Obtaining a list of CE queues that can submit jobs" below for the execution queue.
This sample executes the test.sh script and gets std.out,output.txt and std.err files.
Sample script;
file name : test.sh
#!/bin/sh

echo "Hello World!"
echo "I am `hostname`"
In this sample, echo command is used to output a simple information.
Get a list of CE queues that can submit jobs.
In preparation for submitting a job, you can check the queue name of CE that can submit a job. To check the queue name, you can execute the following command.
#> lcg-infosites --vo ppj ce ↓
The output of this command is as follows:
#   CPU    Free Total Jobs      Running Waiting ComputingElement
----------------------------------------------------------------
  13936       0          0            0       0 kek2-ce01.cc.kek.jp:2811/nordugrid-LSF-gridbelle_heavy
  13936       0          0            0       0 kek2-ce01.cc.kek.jp:2811/nordugrid-LSF-gridbelle_long
  13936       0          0            0       0 kek2-ce01.cc.kek.jp:2811/nordugrid-LSF-gridbelle_mergejob
  13936       0          0            0       0 kek2-ce01.cc.kek.jp:2811/nordugrid-LSF-gridbelle_middle
  ...
The strings after "nordugrid-LSF-" in the above ComputingElement column are the queue names.
These are divided according to the queue available in ppj VO. For example, kek2-ce01.cc.kek.jp:2811/nordugrid-LSF-gridbelle_middle is tied to the LSF queue gridbelle_middle. Select the queue you want to use and rewrite the ( queue = "") parameter in the xRSL file to your desired queue name.
The available queues for UMD System are listed in UMD Queue List pages.
Submit a job
After deciding on the CE and queue to be used, submit the job.
#> arcsub -j joblist.xml -o jobID.txt -c CE -a xRSL.xrsl ↓
joblist.xml : the file where information about the active job is stored
jobID.txt: File to which JobID is output
xRSL.xrsl : The xRSL file to run

Sample) arcsub -j jobs.xml -o jobid.txt -c https://kek2-ce01.cc.kek.jp/arex test.xrsl#> glite-ce-job-submit -r CEId -o file_name -a jdl_file ↓
When a job is successfully submitted, the job ID is output to the file specified by -o. This ID is unique to each job, and the file containing the job ID is used to check the job status and output the results as described below.
- If you do not specify the "-j" option, the output is saved to ". /arc/jobs.dat" in your user home.
- Note that some ROLEs may have queues that cannot be executed.
Check job status
You can check the job status by using following command.
#> arcstat -j joblist.xml ↓
joblist.xml : the file where information about the active job is stored

Sample) arcstat -j jobs.xml ↓
You can check the current status and JobID of a job by executing the above command. You can also use the "-d" option to get more detailed information.
#> arcstat -j jobs.xml -d 2 ↓
The status parameters of job are;
| STATUS | Subscription |
|---|---|
| Accepted | job accepted on cluster but not being processed yet |
| Preparing | job is in phase of preparing for submission to batch system |
| Submitting | communication with batch system in ongoing |
| Hold | job's processing is suspended dueto internal reason or user request |
| Queuing | job is passed to batch system but not being executed yet |
| Running | job being execcuted in batch system |
| Finishing | job in phase of post-execution procedures being run |
| Finished | job successfully completed all processing phases |
| Killed | job processing was interrupted by user request |
| Failed | job processing was interrupted due to detected failure |
| Deleted | job was removed from cluster |
| Other | Other |
Get an output of job
You can get an output of your job by using following command. (The result of the arcstat command must be "Finished".)
#> arcget -j jobs.xml JobID ↓
 joblist.xml : the file where information about the active job is stored
 JobID : A unique identification number for each job processing

Sample) : arcget -j jobs.xml https://kek2-ce01.cc.kek.jp:443/arex/PKSNDmmt8Uxn5W5ySmCfWssoABFKDmABFKDmbDgKDmEBFKDm1Mif6m ↓
After executing the command, a directory named
Forced termination of a job
To kill a running job, execute the following command.
#> arckill -j joblist.xml JobID ↓
 joblist.xml : the file where information about the active job is stored
 JobID : A unique identification number for each job processing

Sample) : arckill -j jobs3.xml https://kek2-ce01.cc.kek.jp:443/arex/qqtLDmN2PVxn5W5ySmCfWssoABFKDmABFKDmbDgKDmLBFKDmRyApun
When you run the above command, the jobID is immediately terminated. To confirm that the job was cancelled, run arcstat. The status of the canceled job will be Killed. (When the termination process is complete, nothing will be displayed.) If you do not specify a jobID, all the jobs listed in joblist.xml will be terminated.
Check available SE
UMD System uses storage element (SE) for data transfer. SE enables metadata access, data upload/download and data replication to other sites.
You can list available SE per VO with lcg-infosites command.
#> lcg-infosites --vo vo_name se ↓
vo_name : VO name
The output shows the hostname, used space and available space of SE.
 Avail Space(kB)  Used Space(kB)  Type  SE
------------------------------------------
     79999999998               2  SRM   kek2-se01.cc.kek.jp
UMD System provides two SE's.
kek2-se01.cc.kek.jp
kek2-se02.cc.kek.jp
kek2-se03.cc.kek.jp
Each SE uses SRM protocol for data management. Actual data is stored to GHI file-system or GPFS Servers.
You can list meta data of StoRM by using following command.
#> gfal-ls srm_URI ↓
srm_URI : URI of meta data

Sample) gfal-ls srm://kek2-se01.cc.kek.jp:8444/ppj/testfile ↓
The -l option lists the detailed information. SRM URI is an unique SRM protocol file path. Its structure is srm://<StoRM hostname:8444>/<Vo name>/<file path>
Upload a file
You can upload files to StoRM by using following command.
#> gfal-copy file_name srm_URI ↓
file_name : target file to upload
srm_URI : URI of meta data

Sample) gfal-copy file:///tmp/testfile srm://kek2-se01.cc.kek.jp:8444/ppj/testfile ↓
By executing this command, testfile is uploaded to kek2-se01.cc.kek.jp. The -v option lists the detailed information. In fact, the testfile is transferred to Ftp server which kek2-se01.cc.kek.jp manages via gridftp protocol. Also, SRM URI is assigned to uploaded file. You can upload files to kek2-se.cc.kek.jp by the same command.
In addition, you can transfer files with SRM URI, not LFN.
#> gfal-copy file:///tmp/testfile srm://kek2-se01.cc.kek.jp:8444/ppj/testfile ↓
By executing this command, the testfile is uploaded to srm://kek2-se01.cc.kek.jp/ppj/testfile.
Download a file
You can download a file from SE by using following command.
#> gfal-copy srm_uri file_path ↓ (Specify the SRM URI)
srm_URI : SRM URI file path
file_path : file path to download a file

Sample) gfal-copy srm://kek2-se01.cc.kek.jp/ppj/testfile file:///tmp/download ↓
For above example, you can download a file with SRM URI.
Replica a file
UMD System provides a function to replicate a file to other SE.
You can replicate a file by using following command.
#> gfal-copy src_name dst_name ↓
src_name : source file(SRM URI, gsiftp URI)
dst_name : destination file(SRM URI, gsiftp URI)

Sample) gfal-copy srm://kek2-se01.cc.kek.jp:8444/ppj/testfile srm://sample.test.org/testfile ↓
By executing this command, the file /gird/ppj/testfile is replicated to kek2-se01.cc.kek.jp.
Delete a file
You can delete a file from SE by using following command.
#> gfal-rm srm_URI ↓ (SRM URI Base)
srm_URI : SRM URI file path

Sample) gfal-rm srm://kek2-se01.cc.kek.jp/ppj/testfile ↓ (SRM URI Base)
To confirm target file is deleted, type gfal-ls command.
WebDAV Interface
You can upload a file to StoRM WebDAV by using following command.
#> curl -T file_name WebDAV_URL --cert proxycertificate --key proxycertificate -E proxycertificate --capath ca_path ↓
file_name : target file to upload
WebDAV_URL : WebDAV URL
proxycertificate : Proxy certificate file
ca_path : CA certificate path

Sample) curl -T /tmp/testfile https://kek2-se01.cc.kek.jp:8443/webdav/ppj/testfile \
      --cert /tmp/x509up_12345 \
      --key /tmp/x509up_12345 \
      -E /tmp/x509up_12345 \
      --capath /etc/grid-security/certificates ↓
By executing this command, testfile is uploaded to kek2-se01.cc.kek.jp.
You can download a file from StoRM WebDAV by using following command.
#> curl WebDAV_URL -o file_name --cert proxycertificate --key proxycertificate -E proxycertificate --capath ca_path ↓
WebDAV_URL : WebDAV URL
file_name : target file to download
proxycertificate : Proxy certificate file
ca_path : CA certificate path

Sample) curl https://kek2-se01.cc.kek.jp:8443/webdav/ppj/testfile \
      -o /tmp/testfile \
      --cert /tmp/x509up_12345 \
      --key /tmp/x509up_12345 \
      -E /tmp/x509up_12345 \
      --capath /etc/grid-security/certificates ↓
By executing this command, testfile is downloaded from kek2-se01.cc.kek.jp.
Software area
UMD System provides a software area for locating software and program per VO. Total amount of this area is about 900GB. The path of this area is as follow.
/opt/exp_soft/<VO name>
All UI and WN have the same path to access the software area. Only lcgadmin ROLE group is allowed to write to this area. For other account group, read and execute permission is attached.
However, large amount of data is unsuitable for this area because this is sharing software area for VO group. If you want to locate large data, please use GPFS or GHI file system. In case of depletion this area, you may be asked to clean files individually by operation team.